


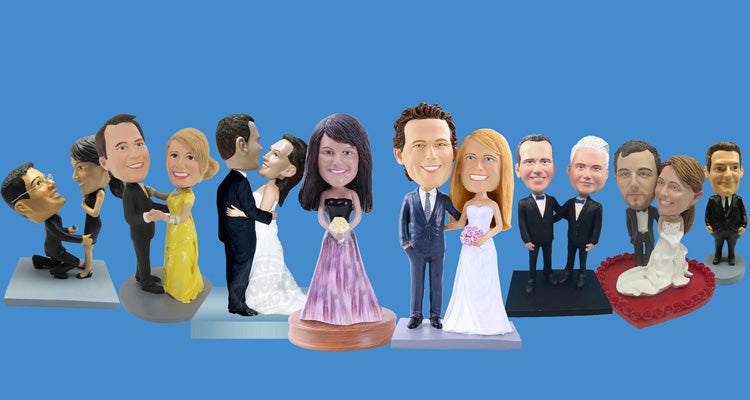


Wedding bobbleheads are a fun way to personalize your big day. Whether you’re using them as cake toppers, gifts, or keepsakes, here’s how to get it right:
- Choose a Style: Decide on poses, themes (e.g., beach, formal), and who to include (just the couple, pets, etc.).
- Plan Quantity and Size: Standard bobbleheads are 6.5 inches tall - great for cakes. Larger sizes work as centerpieces.
- Set Your Timeline: Order early based on production and shipping times. Options range from 14 days (rush) to 12 weeks (standard).
- Provide Materials: Submit high-quality photos, detailed descriptions of features, and wedding attire specifics.
- Customize Details: Add props, accessories, or engraved bases to reflect your story.
- Review Proofs: Carefully check clay and paint proofs for accuracy. Request changes if needed.
- Plan Delivery: Coordinate shipping to your venue or home, and inspect items upon arrival.
- Display and Preserve: Use them as décor during the wedding, then store them safely as keepsakes.
Order ahead, stay organized, and focus on the details to ensure your custom bobbleheads are perfect for your wedding.
Step 1: Plan Your Bobblehead Order
Start by laying out the basics to ensure your custom bobbleheads match your wedding theme and arrive in time for the big day.
Choose Your Style and Theme
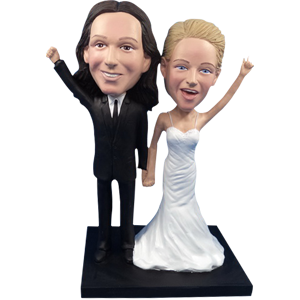
Think about how you want your bobbleheads to reflect your personalities and the overall vibe of your wedding. Do you prefer a classic bride-and-groom pose, like holding hands or sharing a dance? Or maybe something playful that showcases your unique relationship? The choice is yours.
You can also incorporate themes that fit your ceremony. Whether it's a beach or tropical setting, a vineyard backdrop, or even subtle sports details, pick a concept that resonates with your special day.
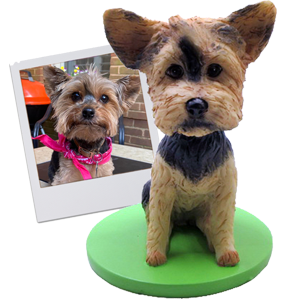
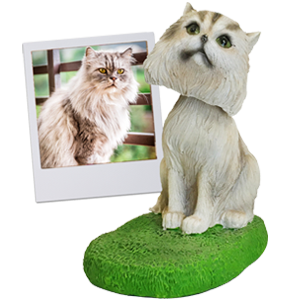
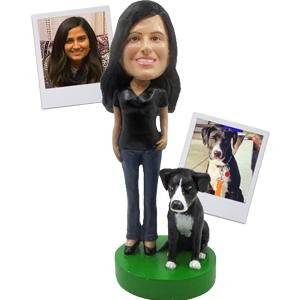
Decide who will be featured in the design. Most couples opt for a two-figure setup, but you can include pets or family members if you’d like. AllBobbleheads offers options for single figures, couples, and even group designs with up to four people - perfect for including immediate family or a beloved pet.
Additionally, you’ll need to choose between standard poses with personalized details or fully customized designs where every feature is tailored to your specifications. Once you’ve nailed down the style, think about the size and number of bobbleheads you’ll need.
Decide on Quantity and Size
The number of bobbleheads you need depends on how you plan to use them. For example, standard-sized bobbleheads (6.5 inches tall, 1.1 pounds) are great as cake toppers, while larger options (8, 9.5, or 12 inches) can make eye-catching centerpieces. If you’re giving them as gifts to family or guests, make sure to account for that in your order.
For destination weddings, check with your venue about display space to ensure the size you choose works well with the setting. Once you’ve settled on the quantity and size, it’s time to focus on timing.
Set Your Delivery Timeline
Timing is everything when it comes to custom bobbleheads, especially for destination weddings where delays can complicate your plans. Choose a shipping option that aligns with your schedule:
| Shipping Option | Total Timeline | Proofing Process |
|---|---|---|
| STANDARD | 8–12 weeks | Customer reviews clay and paint proofs |
| PREMIUM | 6–8 weeks | Customer reviews clay and paint proofs |
| EXPRESS | 4–6 weeks | Customer reviews clay and paint proofs |
| RUSH | 14 days | Internal proofing only |
The STANDARD, PREMIUM, and EXPRESS options let you review and approve both the clay sculpt and painted version during the proofing process. However, the RUSH option skips customer proofing to meet the tight 14-day deadline, meaning you’ll have less input on the final product.
To avoid last-minute stress, place your order 2–3 weeks earlier than the suggested timeline, especially for destination weddings where shipping delays can occur. Work backward from your wedding date to figure out the best time to order. For instance, if your wedding is on June 15th and you’re going with the PREMIUM option (6–8 weeks), aim to place your order by mid-April. Add an extra week or two if the bobbleheads need to be shipped to a destination.
Also, consider where you want the bobbleheads delivered. If you’re traveling to a destination wedding, you might prefer to have them shipped to your home so you can pack them carefully. Alternatively, you can have them sent directly to your hotel or venue - just double-check that they can accept packages.
Step 2: Gather Your Order Materials
Once your order details are set, it’s time to collect everything the artist will need to create your custom bobblehead. Being thorough here ensures the process goes smoothly and the final product matches your vision.
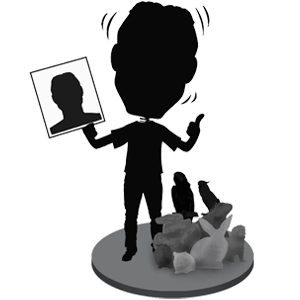
Gather High-Quality Photos
The foundation of a great custom bobblehead lies in high-resolution photos. Start with clear, front-facing shots of you and your partner that highlight your facial features. Good lighting is key - natural daylight works best - to help the artist accurately capture details like skin tone, eye color, and hair texture.
Don’t stop at just one angle. Include additional photos taken from the side and at three-quarter views to give the artist a complete understanding of your facial structure. Close-up shots are especially helpful for capturing unique features like freckles, dimples, or the curve of your smile.
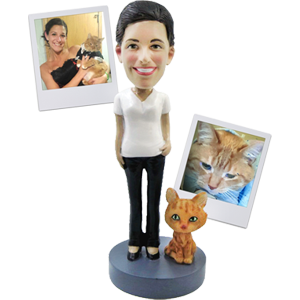
You’ll also want a full-body photo to ensure accurate proportions. If you have an engagement photo in formal wear, include that too. For wedding-specific details, provide pictures of your dress, suit, or accessories. If you don’t have those finalized yet, reference images can work in the meantime. The more visual details you share, the easier the proofing process will be.
"All you need is... 1. A Picture of the person being bobbled... 2. Some simple information like their... hair color, eye color, skin tone!" - allbobbleheads.com
List Key Physical Features
Photos are important, but a written list of features adds another layer of clarity. Include details like hair color (mentioning highlights or lowlights), eye color, skin tone, and any distinguishing marks. Highlight unique traits such as scars, beauty marks, or a gap between your teeth - these small details make the bobblehead feel personal.
Don’t forget accessories. If you wear glasses, describe the frame style and color. For facial hair, specify whether it’s a full beard, goatee, or stubble, and include its color. This written list becomes especially useful during the clay proofing stage, helping the artist fine-tune details based on your feedback.
Share Wedding Attire Details
Your wedding attire will play a starring role in your custom bobbleheads. For the bride, describe the dress in detail - neckline style (sweetheart, V-neck, off-shoulder), sleeve type, train length, and embellishments like lace or beading. For the groom, include the suit or tuxedo color, lapel style (notch, peak, or shawl), shirt design, and whether you’ll be wearing a tie or bowtie.
Accessories matter too. If the bride is wearing a veil, hair comb, or jewelry, mention those. For the groom, note details like a boutonnière or cufflinks. Including reference photos for these items can help ensure every detail is just right.
List Your Customization Requests
This is your chance to make your bobbleheads truly one-of-a-kind. Beyond physical features and attire, think about the personal touches that reflect your relationship. For example, you could have your names and wedding date engraved on the base or include a meaningful message.
Consider adding props or accessories that showcase your hobbies or shared interests. If there’s an item that’s special to both of you, the artist can incorporate a miniature version. Have a beloved pet? You can even request a small figure of your furry friend to be added to the base (though this might come with an extra cost).
To keep things organized, compile all your customization requests in a single list. AllBobbleheads offers over 300 body options to choose from, and you can request changes to poses or clothing at no extra cost during the ordering process. Later, during the paint proofing stage, you’ll have the opportunity to refine details further. Customers have requested tweaks like, “Move the text on the base to the left” or “Make the logo larger”.
Once you’ve gathered everything - photos, written descriptions, attire details, and customization notes - keep them in a single folder or document. This will make it easy to upload everything when the time comes and helps the artist process your order efficiently.
With all your materials ready, you can move on to exploring more customization options.
Step 3: Explore Customization Options
Now comes the fun part - customizing your wedding bobbleheads to reflect the special connection you share. Your choices will showcase your personalities and tie into your wedding’s theme, creating a keepsake that’s as unique as your bond.
Pick a Pose and Position
The pose you choose is more than just a design choice - it’s a way to tell your story. Think about what feels most like you. Classic poses such as holding hands, embracing, or sharing a traditional dance are timeless and elegant.
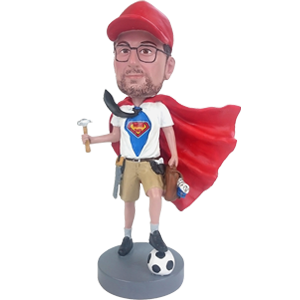
For a more playful vibe, consider poses that reflect your personalities or hobbies. A barefoot pose might suit a beach wedding, while a basketball or golf-themed stance could highlight shared interests. If you want to go all out, you can design everything from scratch, from the body positions to the head details, based on your uploaded images and requests. This approach lets you capture deeply personal moments that resonate with your relationship.
Take inspiration from others: Jen W. from Charlotte, North Carolina, for example, created a custom bobblehead for her son’s college baseball graduation, depicting him “on the field” to honor his achievement. For weddings, you might incorporate elements like props or poses that reflect where you met, your favorite activities, or even an inside joke. Whether it’s coffee cups for a coffee shop meet-cute or musical instruments for a shared passion, the goal is to make your bobbleheads a true reflection of your story.
Select Colors and Finishes
Color plays a big role in tying your bobbleheads to your wedding theme. During the ordering process, you’ll specify colors for everything - skin tone, hair, outfits, and accessories. The art team then hand-paints your bobbleheads to match your vision.
Start by thinking about your wedding’s color scheme. If your palette includes blush, ivory, and gold, make sure the bobbleheads complement those tones. For formal events, ensuring the tuxedo and gown colors align with your attire is crucial. Seasonal weddings might inspire deeper hues for autumn or lighter shades for spring.
During the paint proofing stage, you’ll review the painted bobbleheads and can request adjustments. For example, you might tweak the dress color, make the hair lighter, or ensure the suit shade matches perfectly. Being specific upfront helps streamline this process. Instead of saying “blue dress,” clarify whether you mean navy, royal blue, or powder blue. If your skin tone changes with the seasons, mention that too. The more details you provide, the smoother the customization process will be.
Keep in mind that final paint adjustments focus on color tweaks without changing the structure of the design.
Add Accessories or Props
Accessories and props are where your bobbleheads can truly come to life. Popular options include eyeglasses, jewelry, hats, and watches. For weddings, you might add bouquets, veils, rings, or boutonnieres to complete the look.
Want to make it even more personal? Tattoos can be replicated, and wedding logos or monograms can be added to the base or clothing. Props like miniature surfboards for beach lovers, tiny instruments for musicians, or sports gear for athletic couples can add a meaningful touch.
Even the base offers room for creativity. You could choose a sand-and-sea design for a beach wedding or a simple platform engraved with your names and wedding date. While basic customizations like poses and clothing are often included at no extra cost, more elaborate props or accessories might come with additional fees, so it’s a good idea to confirm pricing before finalizing your order.
"With our wide selection of customization options, you can create a one-of-a-kind gift that truly reflects their personality and style." - allbobbleheads.com
When adding accessories and props, keep things balanced. Too many elements can overwhelm the design, but thoughtfully chosen details can make it meaningful and visually appealing. Focus on what matters most to your story, and remember, you’ll have chances to fine-tune during the proofing stages. So, don’t stress about getting every detail perfect right away - there’s room to adjust as you go.
Step 4: Review and Approve the Proof
The proofing stage is where you ensure your custom bobbleheads align perfectly with your vision. Careful review at this step helps avoid permanent errors.
Understand the Proofing Timeline
The proofing process kicks off within 24 hours of order confirmation, with the initial clay proof ready in 3–5 business days.
The process unfolds in two parts. First, the clay proof focuses on the shape and structure of your bobblehead. You'll review photos of the draft clay model, paying close attention to details like facial features, pose, hairstyle, and the placement of accessories. For example, check the spacing of the eyes, the height of the cheeks, or the positioning of a bouquet. If adjustments are needed, revised proofs usually take another 3 to 5 business days.
Once the clay proof is approved, the bobblehead is hardened, and the process moves to the paint proof stage. At this point, the shape is finalized, and only cosmetic changes - like color corrections - can be made. This is your final opportunity to request changes before the paint dries and the bobblehead is prepared for shipping.
To avoid last-minute stress, plan for at least one to two weeks for the proofing process, including potential revisions. Since vendors recommend having your bobbleheads ready at least a week before your wedding, aim to finish the proofing stage 2 to 3 weeks before the event. This buffer helps you handle any unexpected delays without scrambling.
Once you're clear on the timeline, it's time to focus on reviewing and requesting any necessary changes.
Requesting Changes
When you receive your proof link, act quickly. If everything looks good, click "Approve." If not, click "Deny" and provide specific feedback.
Clarity is key when requesting changes. Instead of saying, "It doesn’t look right", point out exactly what needs adjustment. For instance, during the clay proof stage, you might request, "The eyes should be closer together", or during the paint proof, "Please change the suit color to navy blue."
Most vendors offer free revisions, and their artists will work with you until you're satisfied. Some even allow you to specify pose, clothing, or action changes upfront at no extra cost. For detailed corrections, contact the vendor directly by email or phone, and include reference photos to ensure clarity.
Document every change you request to avoid anything being overlooked. If you're on a tight timeline, aim to provide thorough feedback in the first round to minimize back-and-forth revisions. Remember, each revision typically takes 3 to 5 business days, so being efficient here can save valuable time.
Final Approval
Once all revisions are complete, you’ll reach the final approval stage. This is your last chance to ensure every detail is perfect before production wraps up.
During this review, double-check that all colors match your requests - hair color, skin tone, attire, and accessories. Confirm that any text or logos on the base are correctly positioned and sized. Inspect the facial features one last time to ensure the likeness is accurate. Also, review the precision of details like eye color, jewelry, or tattoos. If multiple angles aren’t provided, ask for front, side, and back views to catch any overlooked details.
"This is your last opportunity to make any changes before we allow the paint to fully dry, package, and ship your bobblehead." - allbobbleheads.com
Before clicking the final approval button, get written confirmation from the vendor that outlines all approved details. Request clear photos of the final proof, along with a confirmed production start date and expected shipping date. Keep your order number and related information handy. This documentation ensures both you and the vendor are on the same page.
If an error slips through - like the wrong dress color or mismatched features - you may need to have the bobblehead remade. That’s why vendors stress the importance of your final say during the proofing stage.
If the proof still doesn’t meet your expectations after revisions, communicate your concerns immediately and professionally. Clearly explain what’s off and provide additional reference photos or descriptions. Most vendors are committed to ensuring customer satisfaction and offer guarantees, which may include further revisions or, in rare cases, a complete remake. Addressing concerns early in the proofing phase is critical to avoiding issues later.
Take the time to review your proof when you’re alert and focused. Use a checklist to compare every detail against your reference photos, and don’t hesitate to request revisions if something feels off. This is your opportunity to ensure the bobblehead is exactly how you envisioned it. Spending time now means you’ll have a keepsake that perfectly captures you and your partner for years to come.
sbb-itb-c56fd50
Step 5: Handle Delivery and Logistics
Once you've approved the proof for your custom bobbleheads, it's time to shift your focus to delivery and logistics. Proper planning is key to ensuring these one-of-a-kind keepsakes arrive on time, especially if you're hosting a destination wedding.
Order Early to Avoid Delays
Timing is everything when it comes to custom bobblehead orders. While standard production takes about 3 to 5 business days after confirmation, you'll also need to account for proofing, revisions, and shipping time. For local weddings, ordering at least a week in advance might suffice. However, for destination weddings, aim to place your order 2 to 3 weeks ahead. This buffer helps you handle potential hiccups - like extended revisions, shipping delays, or customs issues for international deliveries.
Here’s a quick breakdown of typical shipping options and timelines:
| Shipping Option | Processing and Delivery Time |
|---|---|
| STANDARD | 8–12 weeks |
| PREMIUM | 6–8 weeks |
| EXPRESS | 4–6 weeks |
| RUSH | 14 days (internal proofing) |
While the RUSH option might sound tempting, it only covers internal proofing and offers limited flexibility for revisions. EXPRESS or PREMIUM shipping usually provides a better balance between speed and control over the process.
For destination weddings, it’s crucial to provide your vendor with detailed delivery instructions. Include the complete address, a contact number, and the name of someone who can receive the package. Requesting signature confirmation can help avoid missed deliveries. If your venue can’t accept packages ahead of time, consider shipping to a nearby hotel and coordinating with their front desk for a smooth handoff.
For international shipments, research customs requirements early to avoid last-minute surprises. Extra time for customs clearance and proper documentation can prevent unnecessary delays. Once your order ships, tracking is your best friend.
Stay on Top of Tracking
Use the tracking number provided by your vendor to monitor your shipment in real time. Most vendors work with reliable carriers, allowing you to keep tabs on your package’s progress. Double-check that the expected delivery date aligns with your arrival at the venue, particularly if you’re traveling close to the wedding day. If any delays or issues pop up, contact your vendor’s customer service immediately for assistance.
To stay organized, save all shipping documents in a dedicated folder on your phone or cloud storage. This will come in handy if you need to file a claim or request a replacement. For added peace of mind, consider purchasing shipping insurance to cover potential loss or damage - especially if your timeline is tight.
Inspect Upon Arrival
When your bobbleheads arrive, inspect them as soon as possible - ideally 24 to 48 hours before the event. This gives you enough time to address any issues.
Start by photographing the packaging if there’s visible damage before opening the box. After unboxing, compare the bobbleheads to your approved proof. Pay close attention to details like facial features, eye and hair color, skin tone, and wedding attire accuracy. Test the bobble mechanism with a gentle tap to ensure it moves smoothly, and check for cracks, loose parts, or paint imperfections. Verify that custom elements - like props, accessories, or logos - are correctly positioned and sized.
If you notice any problems, document them with clear photos from multiple angles and contact your vendor within 24 to 48 hours. Reputable vendors often resolve issues quickly, especially for time-sensitive wedding orders. For minor flaws, like a small paint smudge, you might decide to proceed. But for major errors - such as incorrect facial features or attire - request an expedited replacement with guaranteed delivery.
Until it’s time to use them, store the bobbleheads in their original packaging in a cool, dry place. If you need to transport them to your venue, use the original boxes or add extra padding to prevent damage during transit.
If you’re planning to use the bobbleheads as cake toppers, coordinate with your baker or cake delivery team ahead of time. Make sure they know how to handle and place the bobbleheads safely, and keep them securely stored until just before the reception.
Step 6: Display and Preserve Your Bobbleheads
Your custom bobbleheads have made a splash at your wedding - now it’s time to show them off and keep them in great condition for years to come.
Position for Display
Once your bobbleheads arrive, you’ll want to find the perfect way to showcase them. One of the most popular options? Using them as cake toppers. Place your bobblehead at the center of the cake, ensuring it sits on a stable base and is well-lit. A decorative or sturdy cake board underneath can help keep it secure during the cake-cutting ceremony.
If your bobblehead includes a custom base or additional design elements, double-check that everything is level and steady before your guests arrive.
Beyond the cake, another idea is to feature your bobblehead on a display table alongside other wedding mementos - like your guest book, framed photos, or thank-you cards. With an average height of about 6.5 inches and a weight of roughly 1.1 lbs, your bobblehead is small enough to fit in seamlessly yet bold enough to catch attention.
Take Photos
Don’t forget to photograph your bobblehead! Capturing it from various angles helps highlight its details and preserves the memory forever.
Natural lighting works best to bring out the vibrant colors and intricate details, like custom outfits, jewelry, or bouquets. Take close-up shots to emphasize these unique touches. Whether your bobblehead is displayed on the cake or staged against a neutral backdrop, high-resolution photos - taken by your photographer or a trusted guest - will ensure its charm is immortalized.
These photos can also serve as a record of the custom design for future reference. To go a step further, keep all documentation - like order confirmations and receipts - organized. This creates a helpful archive for insurance purposes and a sentimental keepsake for years to come.
Store as a Keepsake
After the wedding, your bobblehead transitions from a fun decoration to a treasured keepsake. To keep it safe, consider placing it in a glass case, shadow box, or enclosed display cabinet. These options protect it from dust and accidental damage while keeping it on display.
For long-term preservation, store your bobblehead in a cool, dry environment - ideally between 65–75°F with 30–50% humidity. Avoid areas prone to extreme temperature changes, like attics or basements, and keep it out of direct sunlight. Position it in a low-traffic area, away from pets and children.
If you’re creating a wedding memory display, try grouping your bobblehead with other meaningful items, such as your wedding invitation, ceremony photos, or a framed copy of your wedding date. This approach makes your bobblehead a focal point while tying it into the broader story of your big day.
When handling your bobblehead, always support it by the base rather than the head or body to avoid damage. Dust it gently with a damp cloth, and if you need to store or transport it, use its original packaging or wrap it in acid-free tissue paper. For extra protection during transport, place it in a padded box or protective container to prevent shifting.
Many couples find that their custom bobbleheads become cherished conversation pieces - lasting reminders of their wedding day and the joy it brought.
Conclusion
Getting custom wedding bobbleheads doesn't have to be stressful if you plan ahead. The key lies in focusing on three main factors: timing, clear communication, and personal touches.
Place your order at least a week before your wedding - or even earlier if your event is overseas - to allow enough time for production and shipping. Share high-quality photos and detailed descriptions of features like facial expressions, hairstyles, eye color, and attire. This helps the creator bring your vision to life with precision. Clear communication here is essential for a smoother proofing process.
Treat the proofing stage as your chance to ensure everything looks perfect. Double-check every detail and provide specific feedback for any changes you want.
Add personal touches - like hobbies, unique poses, or special accessories - to make your bobbleheads more than just decorations. These thoughtful details turn them into cherished keepsakes that reflect your story.
Your bobbleheads won't just be cake toppers - they'll be timeless reminders of your love and the memories from your big day.
FAQs
What should I consider when selecting the style and theme for wedding bobbleheads?
When choosing the style and theme for your wedding bobbleheads, think about how they can showcase your personalities and complement the overall vibe of your wedding. Pay attention to details like your outfits, hairstyles, and accessories to ensure they match your big day’s look. Want to make it extra fun? Add elements that reflect your hobbies, shared interests, or favorite activities as a couple.
If you’re planning a themed wedding - like a beach or rustic setting - incorporating those details into the bobbleheads can add a personal touch. To get the best results, provide clear photos and specific customization details so the final product aligns with your vision. With a bit of planning, these bobbleheads can become a cherished keepsake for years to come.
What steps should I take to make sure my custom wedding bobbleheads arrive on time, especially for a destination wedding?
To make sure your custom wedding bobbleheads arrive on time, it’s important to approve the clay and paint proofs promptly. Any delays in this step can push back the entire production schedule.
It’s also a smart idea to place your order early, especially if your wedding involves travel or is a destination event. Getting a head start not only helps avoid last-minute stress but also ensures your bobbleheads will be ready to add that special touch to your big day!
What should I do if my custom wedding bobblehead arrives with defects or doesn’t match the approved proof?
If your custom wedding bobblehead shows up with defects or doesn’t match the approved proof, don’t hesitate to contact the team right away. Make sure to provide detailed feedback and include clear photos of the bobblehead so they can pinpoint the issue.
The proofing process is there to guarantee you’re happy with the final product, so addressing any concerns early is key. The team will collaborate with you to make necessary adjustments and ensure you receive a bobblehead you’ll cherish.
Related Blog Posts
- How to Order a Personalized Bobblehead: Step Guide
- Wedding Bobbleheads vs Traditional Cake Toppers
- How Custom Bobbleheads Make Perfect Achievement Awards
- How to Customize Holiday Bobbleheads


